




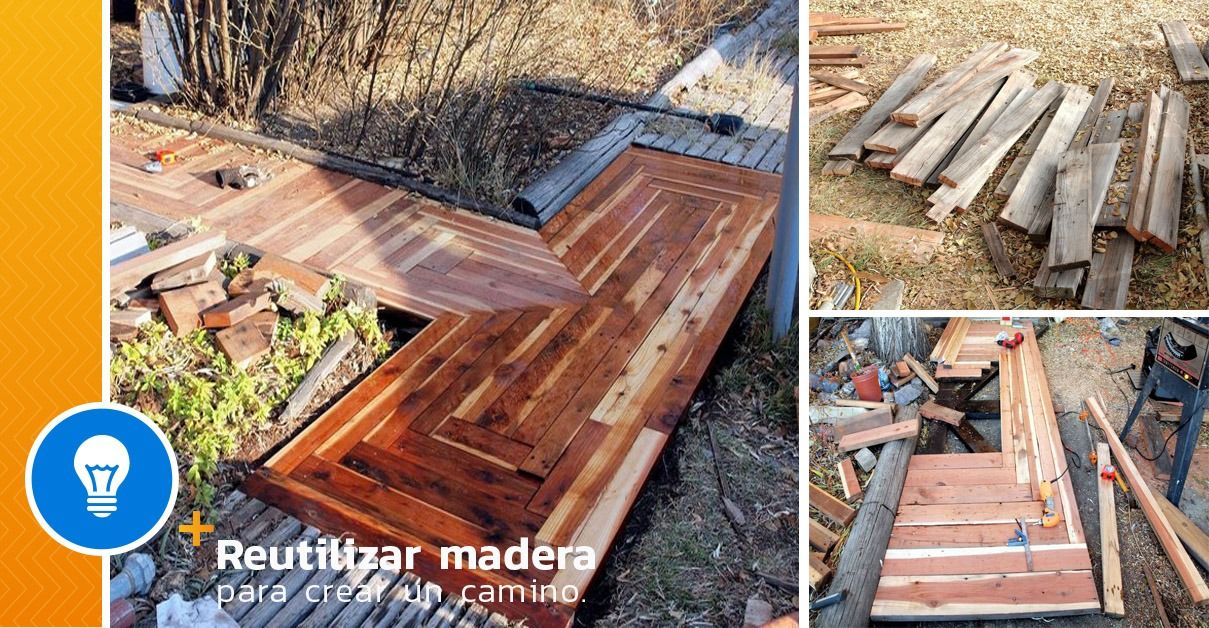

How to Turn Reclaimed Wood into a Sidewalk. A little reclaimed wood, hard work, and a little creativity will give you this beautiful garden path. And by using recycled materials, you're being kind to your wallet and the environment. The owner of this project needed a new road, but he didn't want to spend money on concrete. Now concrete is usually permanent, but not where you live. He knows from experience that concrete roads will not last long in his area due to expansive soils. Between changes in temperature and humidity, the ground moves enough to break up concrete paths.
Materials:
- redwood pieces
- 6 boxes of deck screws
- ½ Gallon Deck Sealer
- A mixture of used motor oil
- 1/3 diesel fuel
- Wood sealer
Tools:
- Electric drill
- Table saw
- Wood planer
- Mitre Saw
- Circle saw
- Measuring tape
- Hammer
- Brushes
- paint brush
- Dremel
Steps:
Redwood lumber that was torn down and replaced.

A wood planer shaves off the top layer of wood to expose the good wood underneath. It is very important to check the wood for hidden screws or nails. It usually takes at least three passes to get it looking good. Remember that you will need to do this on all boards of the same size to avoid some boards sticking out over others. Decide from the beginning which side is going to be the top. Be careful of lead paint on old boards. If you suspect they may have it, throw them away.

You can use the table saw on these to cut 2x6s up to 2x4s. Also 2×8 can become 2×6. Start by cutting off the worst edge; don't try to cut it completely at once. Then rerun the operation and square the other edge.
You should now have a nice flat square side working against the cutting guide. Measure and position the fence for the final dimension (3 ½ inches for a 2x4) and recut the worst edge to make your 2x4. Also, be aware of any screw or nail holes in the board, if you can trim them while cutting the board, the better.

The length of each section was determined by the length of the longest 2x4 board I had, since those were the ones that ran lengthwise. The sections can be separated by simply removing the 2x6″ connections where they meet. By doing this, the sections are small enough that you can keep them on the edge if you need to place them underneath. Sections of sidewalk float freely. They are not attached to the ground. The support panels are supported by bricks that can be adjusted to make them level.

For support boards you can use boards that are in the poorest condition. This is one of the reasons you should sort your wood and decide what will be used for what. However, if they are going to be in contact or very close to the ground, they must be treated.
Commercial wood preservatives and some of them just don't work well. However, one thing that does work is a mixture of used motor oil and one-half to one-third diesel fuel. This has been in use in this area for a long time.
I learned that they used to use it to treat wooden cars. Some use it to treat flatbed trailers left in the elements for years. The oil penetrates the wood and appears to seal it from moisture. Oil and water do not mix, so if the wood is saturated with oil, no water will get in. Also insects don't like it.
Diesel fuel dilutes the oil and acts as a transport agent to move it deeper into the wood. I have seen fence posts that were treated with oil still in the ground after 30 years. Very little oil is transferred to the ground, so it is not a contamination problem. One disadvantage is the smell. It is also more flammable than plain wood, but again that is not usually a problem for outdoor landscaping projects.
To apply it, simply paint with an old brush and let it soak into the wood. Pay special attention to the ends of the boards and any holes or cracks in the boards. Weathered wood with a lot of cracks actually works very well, as it gives the oil more places to absorb. If you have time to wait, you should let it sit for a few days until it absorbs enough.

Since I was using this pattern, the support boards would not be at a 45 degree angle. You can cut these types of angles and pieces by placing one board on top of the other and marking it for the cut. You don't need to try to draw the angles with a protractor, just line everything up and mark them and make the cut. These joints are the only places where the circular saw is used.


For the next section reverse the pattern that was being used, which creates an even more interesting look. Please note that because there were no standard size lumbar pieces, each board had to be measured and cut to fit its specific location.


After completing the first 2 sections, place the sealant over it. The wet sealant looks really impressive. Too bad it doesn't stay that way. It really shows off the color of the redwood.


Since the next section turns both left and right, change the pattern a little and send it in both directions.


Again using interesting angles.

Screw the last boards and project finished.


Who knows, maybe you can reclaim some of the soil from the bushes and get flowers growing again.

Get more information at perfectaidea.com and in our Facebook for more How to Turn Reclaimed Wood into a Sidewalk.